
Tips and Tricks for Setting Up Your Piano Lab Classroom
If you were given an unlimited budget and no restrictions on space what would your ideal piano classroom look like? Most of us could probably come up with an answer pretty quickly to that question. You might be imagining rows of top of the line electric keyboards with an integrated communication system that allows you to listen to your students playing. Maybe you’re imagining a piano lab you used in college. However, this perfect world is not not the reality for the majority of us teaching in K-12 schools. Whether you’re in an already pretty good classroom, setting up a classroom from scratch, or shoved in a room originally intended for use as a closet, we all have to interface with the realities of the specific space we’ve been assigned. So in this article, let’s take a look at some common challenges and space restrictions you may encounter and ways we can create a well structured, inviting learning space for our students anyway.
Challenge 1: The Outlet Situation
I walked into my first classroom as a high school piano teacher to discover that the room I had been assigned had a grand total of 6 outlets, one of which was already being used for the teacher computer and smartboard. Had this been a math or English room, this would have been no problem at all. But for a piano lab…. huge problem!
There are a few solutions to what I call “The Outlet Situation” (most of which involve extension chords). In my classroom, I created piano pods which were groups of 2-4 keyboards all grouped around an outlet. This solution, originally born of necessity, has dramatically improved the way I teach. Piano is often a solitary instrument. Students usually play solos and don’t often collaborate in the traditional private lesson setting. However, in a piano classroom, group learning and playing can be hugely motivating for students. I’ve had many students who are way more likely to learn when tasked with a duet they can play with a friend, than a solo they need to learn on their own. Below, take a look at several piano pod configurations. All of these configurations, I have tried out in my own classroom, and all of which are ideal for peer to peer collaboration.
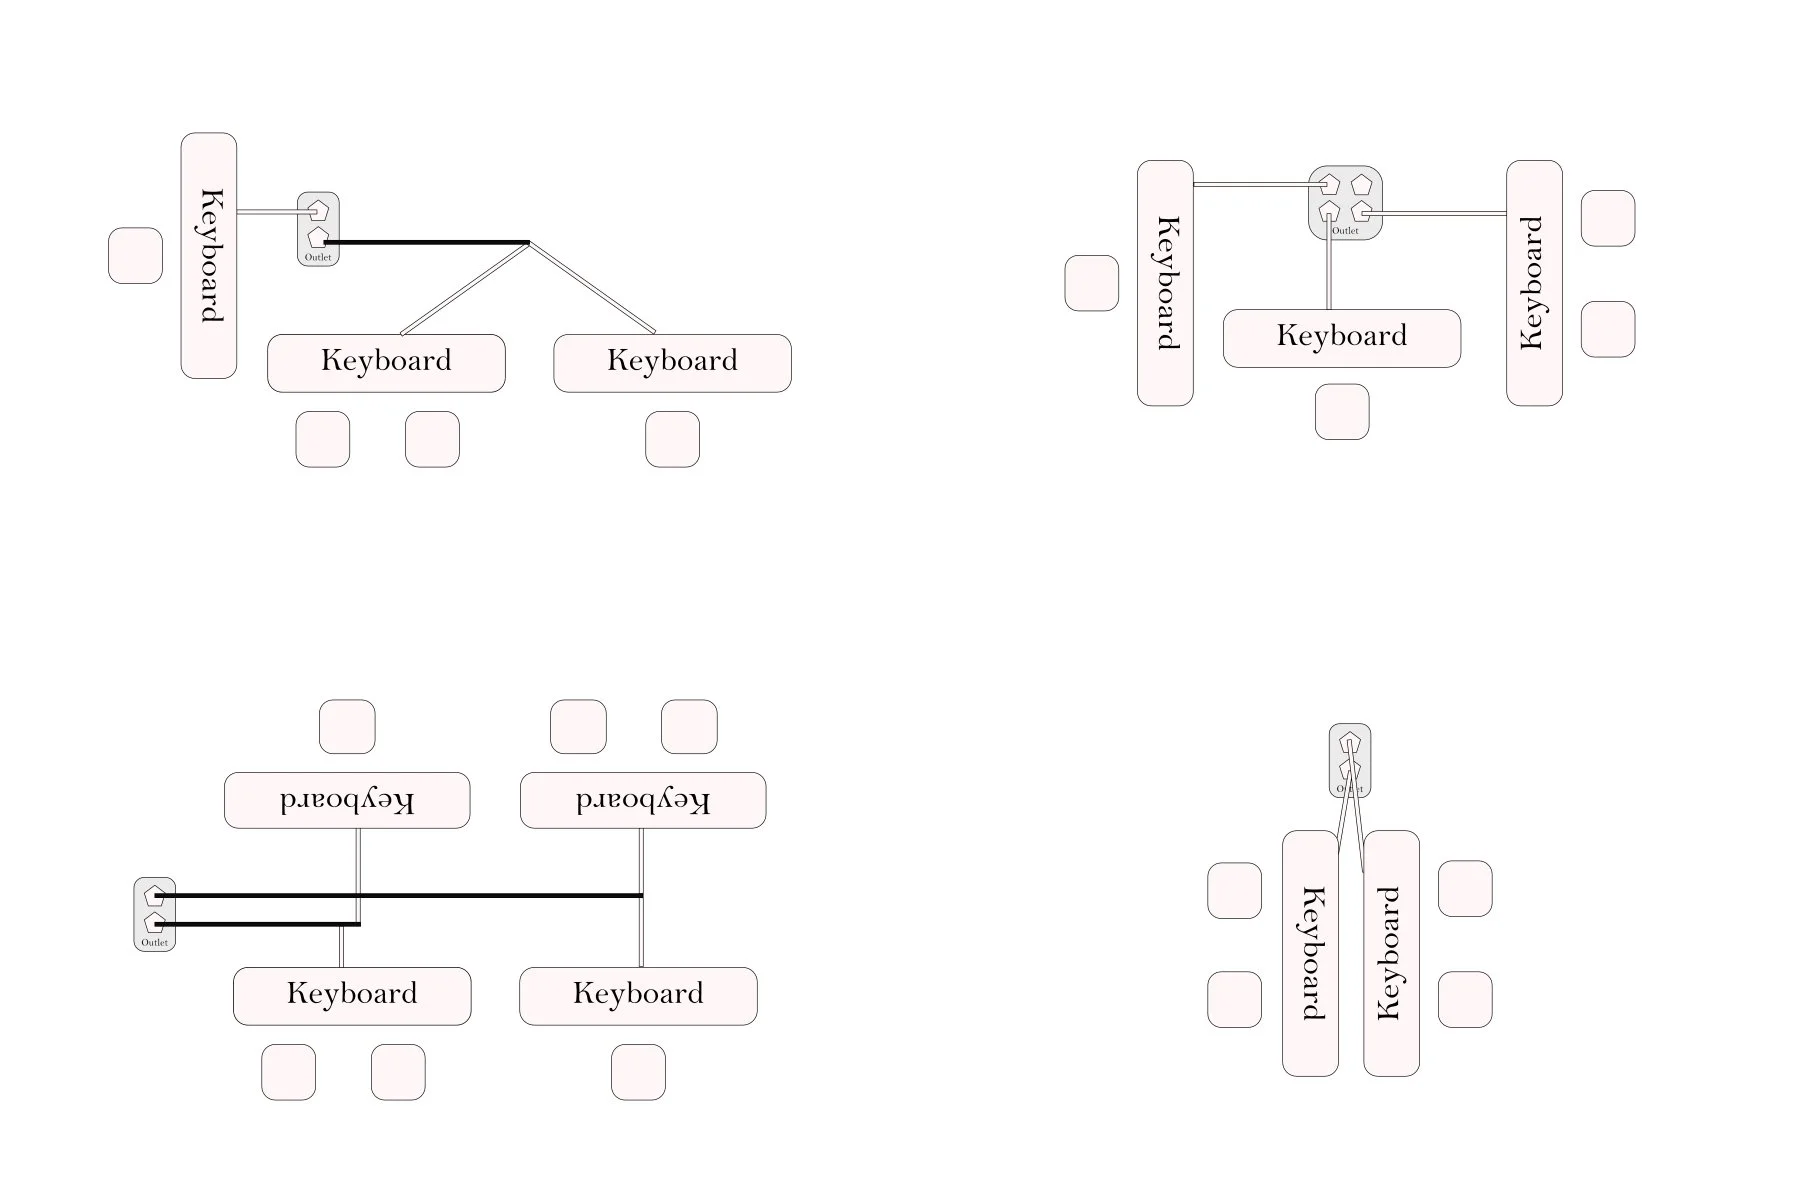
Piano Pods: Solid black lines indicate an extension chord. Grey lines indicate keyboard power chords.
When creating your piano pods make sure to take safety into account! Avoid daisy chaining power strips (plugging one power strip into another power strip) as this is a fire hazard. Choose power strips with surge protectors and make sure you adhere to your school and district policies. Securely tape down all wires to avoid tripping hazards. Additionally, create clear pathways for your students to enter and exit the classroom and teach them these safe routines at the beginning of the year.
Challenge 2: Space Sharing Solutions
In some schools the piano lab classroom is not its own classroom, but rather a corner of the band, choir, or orchestra classroom. This can present a problem for several reasons. Both an ensemble and a piano lab take up a lot of space but in different ways. The equipment involved in both set ups can be heavy and/or bulky making it difficult to simply store instruments not in use for a given period or move equipment around as needed. Additionally, extra instruments laying around can present a temptation for students who may be genuinely curious about an instrument (or age appropriately impulsive or mischievous). Because of this, it’s important to solve these issues both from a logistical and a classroom management lens.
Logistical Solutions
Some of the logistical solutions to sharing space will vary from school to school and room to room. Look at your specific room and determine what areas are more conducive to ensemble or traditional classroom set ups and what are more conducive to a keyboard lab. This may need to be done in partnership with other music teachers if you are not also responsible for directing ensembles.
Once you have designated which space will be used for which purpose, it is important to think through how you will convey this information to your students. One strategy you could consider is using or creating physical features of the room to delineate one space from another. Consider borrowing from the elementary playbook and using a rug to demarcate one area from another. I use colorful electrical tape on the floor to separate areas of my classroom used for different purposes.
Consider what materials can be stored away when another group is using the space and how those transitions will be implemented. Assign different students a specific task or make your expectations clear to all students what the room should look like when they leave. This could involve stacking piano books and pushing in piano benches. For objects that can’t be put away, consider where in the classroom they should live. For example, maybe there isn’t adequate closet space for your largest bass drum, but maybe that bass drum can live on the opposite side of the classroom from the piano lab.
Classroom Management Solutions
Creating a safe environment for your students starts from the moment they walk in the classroom. On the first day of school, establish where you want your students to go when they enter the classroom and what they should be doing. Do you want your students to sit at a keyboard or a desk when they come in? What materials do they need to have ready to go when class starts? Do you want to incorporate activities like do-nows or warm-ups? Giving students a task can redirect the high energy with which they may enter the room.
Like “The Outlet Situation”, what can be seen as a challenge can also be used to your advantage. What materials in your classroom can be adapted for piano class, even if not intended for piano class? Do you have a lot of percussion equipment in your room? Use percussion instruments to teach new rhythms. Is there a grand piano in your room for choral accompaniment? Open up the lid and teach a lesson on how the piano works.
Challenge 3: The Budget Optimization Problem
The unfortunate reality is that not all arts programs are well funded. As a result, we often find ourselves in situations in which we need to use every dollar wisely. Here are few recommendations for how to get the most out of your small budget.
When purchasing new equipment, prioritize purchasing fewer full length keyboards over many partial keyboards. You do not need to have one keyboard per student in order to run an effective piano lab class. Two adult sized people can comfortably sit at one full length keyboard. Sitting two students at one keyboard promotes collaboration and gives you the flexibility to assign duets, have students play solos together at the same time, or ask students to take turns playing the piano by themselves. Additionally, if you’re worried about space, one full length keyboard often takes up less space than two partial keyboards.
Remember that you don’t have to only purchase one model of keyboard. Consider purchasing one ‘nicer’ keyboard with weighted keys and balancing that with cheaper keyboards. Students can rotate, playing on different models different days. This gives students the experience of playing a nicer model instead of all students playing a mid range model. You can then slowly update your keyboard lab over time, purchasing one nicer keyboard a year.
It’s also helpful to purchase a few keyboards on x style stands that can be moved more easily in addition to stationary console keyboards. This can give you flexibility for a wide range of scenarios. If you share space with an ensemble, these keyboards can be stored in a closet when the space is being used for by other groups. These keyboards can be moved around the classroom for group activities and can be easily transported for things like concerts in outside venues.
Bonus Tips and Tricks
Create Classroom Zones
Whether your piano classroom is dedicated to piano, or a shared space, having specific areas designed for different activities can help establish classroom procedures and expectations. For example, have a traditional chair/desk set up in front of a smartboard or screen, away from the keyboards. This is a great spot for listening activities and music theory exercises. In my classroom, this is the area where students know to pay attention and are further away from the distraction of the keyboards.
The Student Center
Designate one corner of the classroom to store anything a student might need to access during a class. This may include extra pens/pencils, pencil sharpener, hand sanitizer, tissues, lesson books/materials or student folders. Make sure students know where this ‘student center’ is in your classroom and what they can find there. I allow my students to get up on their own to get whatever they need from the student center. This reduces the number of interruptions to the lesson and encourages student independence.
Overall Thoughts
Remember that having a state of the art piano lab does not guarantee quality piano instruction. Nor does having a make-shift, imperfect piano lab mean that students will receive make-shift, imperfect piano instruction. At the end of the day, success in the piano classroom has much more to do with creating a culture of learning and collaboration than having the perfect equipment.